Saturday, February 2, 2013

Quick Butterfly Card

Hi,

I just made a quick and easy butterfly card and thought I'd share.


I used 2 sheets of black and white patterned paper, foamtape, scissors, tape runner, butterflies printed onto glossy cardstock, white cardstock
not in the picture are my ink (Memento Dew Drop - Bamboo Leaves), stamp (Dankeschön [Thank you]), aquapainter, watercolor, glue dots and a small piece of green cardstock.


Friday, February 1, 2013

Book love

 ----------Decorating and crafting with old books----------


Hello everybody,
recently I was looking through the classified ads and found somebody, who gave old books away. I am now proud owner of 10 new old books.

I love books. I decorate with them, scan them, take them apart (only if they're not valuable), craft with them and collect them. Sometimes I even read them ;-)

I also love sites like the graphicsfairy, where you'll find scanned images of old books.  This compass is from her site, printed out and used to make this quick card.


To make this book pillar, all you'll need is an inexpensive old book .  I took a cheap romance novel, folded all pages to the middle and ripped off the backing.
Use it to hold your notes, or wrap a ribbon around it for a decorative pillar. If you put a glass circle or something else fire proof on top, you could also use it as a candle holder.


This 2-5-7-10 box was decorated with pages from an old dictionary. 
Except for the thickness of the paper you can use bookpages in the place of patterned paper on most papercrafts you do.


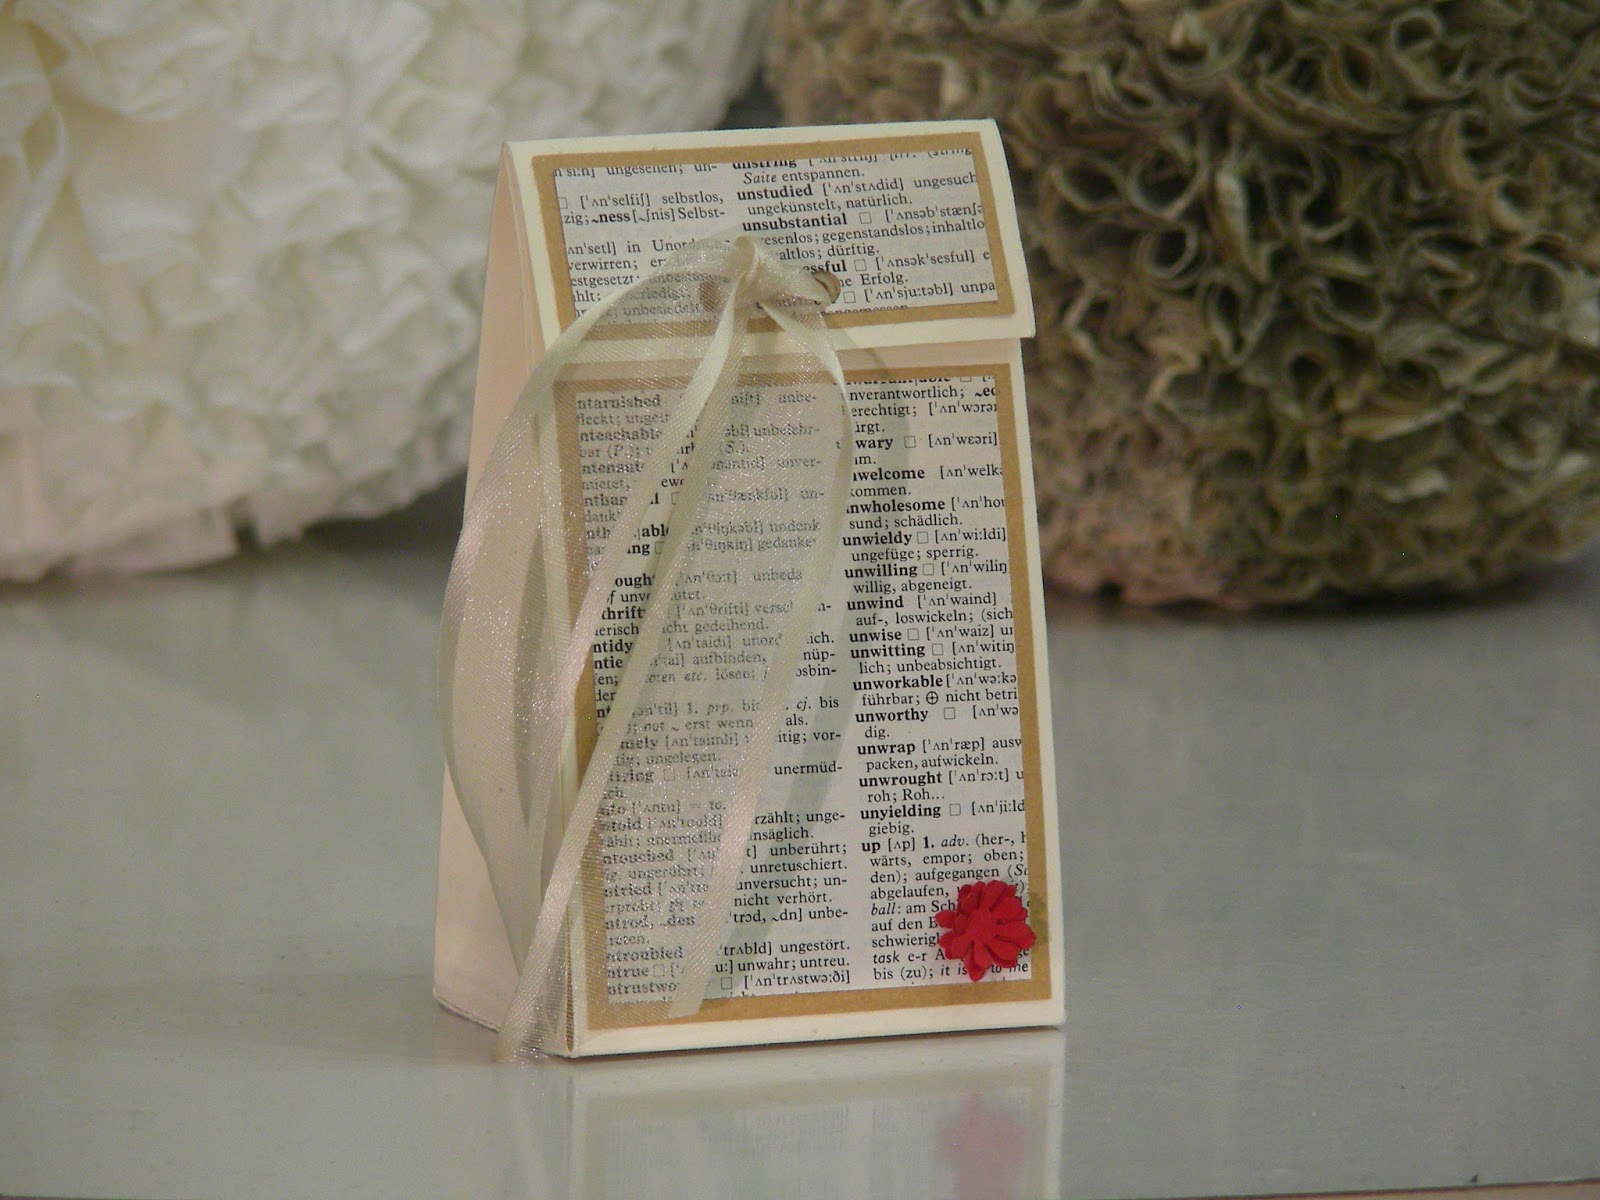
If you're using old books, make sure it's not a favorite of a family member. My mom wasn't very happy a few years ago, when I took "The little prince" and made an earring holder out of it.
Since then I came to regret using that book myself, so pay attention to which books will get taken apart and which are better used for something, that doesn't harm them. Like decorating a tablescape, leaving them in your bookshelf, scanning them, or even selling / giving them to somebody who will appreciate your old books.


With love

Celstina

Wednesday, January 30, 2013

Teebeutelspender - Anleitung

Hallo zu meiner ersten Anleitung. Ich habe sie gerade eben schon in englisch geschrieben, wenn Dir englisch lieber ist klicke hier: Tea bag dispenser

Hier der Teebeutelspender um den es geht:


und hier die Anleitung:


nee, natürlich nicht ;-)

das war meine erste Skizze nachdem ich die Idee hier gefunden habe.


Jetzt aber zum richtigen Tutorial:

Alle Maßangaben sind für die Teebeutel in Einzelkuverts von Teekanne (Ingwer-Lemon hmmm)wenn Du andere Teebeutel verwendest mess' vorher nach und pass' gegebenenfalls die Maße an. Meine Kuverts sind 2 5/16" x 2 1/2".
Ich verwende ausschließlich Inches in dieser Anleitung, da ich einen Scor-pal (Falzbrett) mit dieser Skala habe und alle meine Boxen damit mache. 

Du brauchst ein Stück Tonkarton (200g/qm - 300g/qm) mit den Maßen
11 1/2" x 8,2"(normale DIN A4 Breite) 

oder 
11" x 8" wenn du mit dem amerikanischen Letter-Format arbeitest.

Nach obigem Diagramm werden alle senkrechten roten Linien gefalzt. Dann um 90° drehen und bei 2 1/2" falzen. (waagerechte rote Linie)
Dort wo die blauen Linien sind wird eingeschnitten, die blaue Fläche komplett abgeschnitten.

Jetzt kommt die Öffnung:
 
Dreh' Dein Papier um, sodass die Vorderseite nach unten zeigt. Mit Bleistift und Lineal werden jetzt Linien für die Öffnung gezogen. 

Ich bin bis ganz knapp an die Falzlinien heran und ungefähr 1/2" hoch. Jetzt am besten mit einem Bastelskallpel und Lineal ausschneiden. 
Den Halbkreis habe ich mit meinem Kreisschneider geschnitten. Wenn Du keinen hast kannst Du auch um den Deckel vom Prittstift o.ä. eine Linie ziehen und per Hand ausschneiden.

Jetzt ist der beste Zeitpunkt zum dekorieren, nach dem zusammenkleben wird es fast unmöglich etwas über die Öffnung geklebtes einigermaßen rund auszuscheiden. (Frag' mich nicht woher ich das weiß ;-)) Oder überspring' das zusammenkleben, mach erst das Oberteil ohne kleben und dekorier beides gleichzeitig.
Mit Stempeln, Farbe, Papier was auch immer Dir gefällt, wird die Box verschönert.
Ich habe den gleichen Karton genommen, mit Schokobraunen Schnörkeln bestempelt und die Kanten mit der gleichen Farbe eingefärbt.

 
 Nun gehts ans zusammenkleben:
Auf alle pinken Laschen kommt DoppelklebeBand drauf. Am besten das Schutzpapier auf dem Klebeband an der langen seitlichen Lasche noch dranlassen. Dann werden sie in der oben gezeigten Reihenfolge zusammengeklebt (1 auf 2 auf 3 auf 4). Jetzt das Schutzpapier abziehen und die seitliche Lasche vorsichtig ausrichten und festkleben.

Jetzt fehlt uns nur noch das Oberteil.
Du brauchst ein Stück Tonkarton mit den Maßen
4 5/8" x 4 7/8" 
reihum alle Seiten bei 1" falzen und an den blauen Linien einschneiden.
Nach Geschmack dekorieren und zusammenkleben. Fertig :-)

Hier kommen noch zwei Bilder vom fertigen Produkt:


Uff, das war anstrengender als das englische Tutorial. Ich lese fast ausschließlich englische Bastelseiten und hatte oft keine Ahnung wie ich bastelspezifisches im deutschen am besten ausdrücke.
Ich hoffe es war trotzdem verständlich. Über Rückmeldung, Kritik, Kommentare, und Tipps würde ich mich sehr freuen.

Alles Liebe

Celestina


Tea bag dispenser - my first tutorial

Tea bag dispenser


welcome to my first tutorial, here's what we're going to make: 


and that's what the instructiuons look like:


;-) not really

it's my first sketch after I found the idea here.


Now onto the real instructions:
You will have to change those measurements depending on the size of your teabag. Mine is 2 5/16" x 2 1/2"


Cut your cardstock to 11" x 8" if you're using lettersize or 11 1/2" x 8,2 (it's the width of a normal  Din A4 sheet) if you're using A4 cardstock. (It only affects the size of the gluetab, which will be only half an inch, when you're using lettersize)


Score as shown in the template, then turn and score at 2 1/2"
Cut along the scorelines to make flaps and cut off the piece under the sideflap.

Time to cut your opening.

turn your paper around, so the beckside is facing you and take a ruler and pencil.

Lightly mark a square where indicated in the diagram. The size is up to you. I made mine approx. 1/2 inch high and almost to the scorelines. Cut with your x-acto knife.
I took my circlecutter to make the halfcircle. Use yours if you have one, or trace a gluecap and cut by hand.

Now you can decorate it. Stamp it, paint it, or add panels like I did. Don't add panels after glueing it if you want a panel, where your cutout is. It's almost impossible to cut that curve then. (Don't ask me how I know that :-))


Ok let's glue it together.
Turn it face-up, add glue to all your flaps, except the one under your cutout and put it together in the order shown above. (1 onto 2 onto 3 onto 4) Pay attention to the side. I used scor-tape and left the backing on it until the bottom was glued down. Then bend your sideflap inwards, remove the tape and carefully align it.


Now onto the top.
Cut your cardstock to 4 5/8" x 4 7/8" 

Score all around at 1" and cut slits for the flaps.
Glue them to the sides and you're done.


And here are a few more pics of the finished tea bag holder:


If anything's unclear or my english wasn't up to the task, ask away. I'll be happy to help.

With love

Celestina

P.S. I just posted this tutorial in german. If you're interested, here's the link

Tuesday, January 29, 2013

Hallo an meine ersten Leser!

Ich habe lange darüber nachgedacht, ob ich diesen Blog in englisch oder deutsch schreiben soll. Im deutschen fühle ich mich eindeutig wohler, aber basteltechnisch bewege ich mich vorwiegend in der englischsprachigen (Internet-)Welt.
Ich habe mich schließlich für beides entschieden. Da ich die Sprachwechsel zwischen Absätzen nicht leiden kann, werde ich meine Posts 2mal schreiben. Einen englisch, einen deutsch.
Der Grundgedanke ist der gleiche, nur im deutschen wahrscheinlich mehr ausgeschmückt. ;-)
Ich will alle Posts mit englisch / deutsch Labels versehen, sodass ein Klick auf's Label genügt, um die Sprache auszuwählen.

So jetzt geht's aber endlich mit dem Blog los:

 All you need is love
All you need is love - by CK
Hier wird es um's Basteln gehen. Vorwiegend Kartengestaltung.
Ich bastele seitdem ich ein kleines Kind war.
Trotzdem bezeichne ich mich als Anfängerin. Im Netz ist eine solche Bandbreite an Bastel- und Kartenideen mit wunderschönen Bildern, Anleitungen und Vorlagen zu finden, dass man ständig etwas neues zum lernen findet.

Auf meiner Pinterestseite sammle ich Inspiration, Techniken, SVGs für meinen CraftRobo, Freebies und und und. Schau dich um und pin mit.

So genug geschrieben für heute, morgen gibt'S die erste Anleitung.

Alles Liebe

Celestina

Hello to you, my first readers

I spent a long time trying to decide, wether to write this blog in english or german.
In the end I have decided to do both. Since I don't like alternating paragraphs, I'll do alternating posts instead. I'll label by language, so you should be easily able to choose yours by clicking that label.

Now onto the first post ;-)
All you need is love - by CK


This Blog will mainly deal with papercrafting especially cardmaking.
I've been crafting since I was a little child with breaks inbetween when something else took my fancy. I still think of myself as a beginner.
There's so much content out there on the web, so many talented artists and crafters. It's quite humbling to see some of their beautiful creations.

On  Pinterest I share my inspiration, tutorials, templates, SVG's, and many more things I found and liked.


Tomorrow I'll write my first tutorial. Now I'm going to bed.

That's it for my first post. I hope you enjoyed it and will come back.

With love

Celestina